Recently, my company is moving our web hosting to Amazon Web Services or more commonly known as AWS. For security purposes, it is always a good idea to only expose certain ports to the internal network only and not have it exposed to the entire internet. However, as a developer, I need those ports exposed so that I can upload files or easy access to the database through the database workbench software. This will require me to be authenticated to the internal network, so that I can get access to those ports.
To do this, I will need to setup Client VPN to the internal network using a method called mutual authentication. However, I have found that documentation on both AWS and other sites on the internet were outdated on EasyRSA and I had figure it out on my own. Below are the steps I took to do the setup:
Section 1: Generate server and client certificate keys


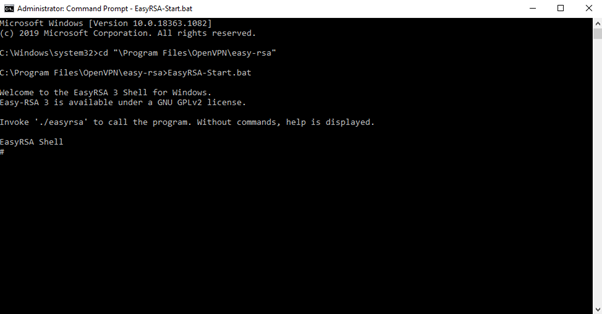
Step 7: Run this command to initialize the environment and setup the folder structure for the client PKI.
./easyrsa init-pki
Step 8: Generate the Diffie–Hellman key. This key makes it possible to exchange cryptographic keys between the server and clients securely.
./easyrsa gen-dh
./easyrsa build-ca nopass
./easyrsa build-server-full OVPN-SERVER nopass
./easyrsa gen-req Client1 nopass
./easyrsa sign-req client Client1 nopass
- Client Key: C:\Program Files\OpenVPN\easy-rsa\pki\private\Client1.key
- Server Key: C:\Program Files\OpenVPN\easy-rsa\pki\private\OVPN-SERVER.key
- Client Cert: C:\Program Files\OpenVPN\easy-rsa\pki\issued\Client1.crt
- Server Cert: C:\Program Files\OpenVPN\easy-rsa\pki\issued\OVPN-SERVER.crt
- CA cert: C:\Program Files\OpenVPN\easy-rsa\pki\ca.crt
Section 2: Import Certificates into AWS Certificate Manager
Step 1: Goto https://console.aws.amazon.com/acm/home
Step 2: Choose “Import a certificate” to import the server certificate.
Step 3: On the Import a certificate page, copy/paste the content:
- From the OVPN-SERVER.crt file to Certificate body.
- From the OVPN-SERVER.key file to Certificate private key.
- From the ca.crt file to Certificate chain.
Note: the crt and key files are text files, all you need to do is open them up in your favourite text editor and copy/paste the content.
Step 5: Choose “Import a certificate” again to import client certificate:
- From the Client1.crt file to Certificate body.
- From the Client1.key file to Certificate private key.
- From the ca.crt file to Certificate chain.
Section 3: Create a new Client VPN endpoint
Step 1: Open the Amazon VPC console at https://console.aws.amazon.com/vpc/.
Step 2: In the navigation pane, choose “Client VPN Endpoints” and then choose “Create Client VPN Endpoint”. If you want, you can give the endpoint a name and description, but this is optional.
Step 3: For IPv4, specify an IP address range, in CIDR notation, from which to assign client IP addresses. For example, 10.0.0.0/22. I used 192.168.0.0/22 because the example IP address range clashed with my computer’s internal LAN IP address subnet.
Step 4: For Server certificate ARN, specify the ARN for the TLS certificate to be used by the server. If you have done section 2, correctly, both the server and client certificates you uploaded previously should be showing in the dropdown. Choose the server certificate.
Step 5: Specify “mutual authentication” as the method to be used to authenticate clients, and then for Client certificate ARN, specify the ARN of the client certificate that you uploaded previously in Section 2.
Step 6: Choose No for “Do you want to log the details on client connections?“
Step 7: Leave the rest of the default settings, and choose “Create Client VPN Endpoint“.
Note: After you create the Client VPN endpoint, its state is “pending-associate”. You can immediately move on to Section 4 without waiting for anything else to happen.
Section 4: Enable VPN connectivity for clients
To enable clients to establish a VPN session, you must associate a target network with the Client VPN endpoint. A target network is a subnet in a VPC.
Step 1: Continuing from the previous section, after the VPC has been created, in the lower section of the screen, there should be an “Associations” tab. Click on it and then choose “Associate“.
Step 2: This should take you to a screen with 2 dropdowns. On the first dropdown labeled “VPC”, select the VPC that you have just created.
Step 3: For the “Choose a subnet to associate”, choose your preferred subnet to associate with the Client VPN endpoint.
Step 4: Choose “Associate”.
Note: It can take a few minutes for the association light to turn green, you can move on to the next section without waiting for this to happen.
Section 5: Authorize clients to access a network
To authorize clients to access the VPC in which the associated subnet is located, you must create an authorization rule. The authorization rule specifies which clients have access to the VPC. In this tutorial, you grant access to all users.
Step 1: Following the last section, now choose the “Authorization” tab, and then choose “Authorize Ingress“.
Step 2: For Destination network to enable, enter CIDR of the network that you entered in Section 3, Step 3.
Step 3: For Grant access to, choose Allow access to all users.
Step 4: Choose Add authorization rule.
Section 6: Download and setup the Client VPN endpoint configuration file
Step 1: Following section 5, on the VPC homepage you should see a Download Client Configuration button, choose it and download the file.
Step 2: Find the client certificate and key files that you generated in Section 1.
Step 3: Locate the configuration file that you downloaded in Step 1 and open it using your favourite text editor. Find the line just after the closing tag of the ca section “”.
Step 3: Put the contents of the crt file between and the contents of the private key between . Paste the following into the configuration file:
Contents of client certificate (.crt) file


Contents of private key (.key) file
Step 4: Prepend a random string to the Client VPN endpoint DNS name. Locate the line that specifies the Client VPN endpoint DNS name, and prepend a random string to it so that the format is random_string.displayed_DNS_name. On the fourth line in the configuration file, you will find the endpoint dns name, for example:
remote cvpn-endpoint-0102bc4c2eEXAMPLE.prod.clientvpn.us-west-2.amazonaws.com 443
Change it to:
remote adwdertf.cvpn-endpoint-0102bc4c2eEXAMPLE.prod.clientvpn.us-west-2.amazonaws.com 443
Step 5: Save and close the configuration file.
Section 7: Setup and connect to VPN using OpenVPN Connect.
If you have installed OpenVPN correctly on your computer, you should have an app called OpenVPN GUI. If you are not sure where it is, user your Windows search bar to look for it. Click on it to run it. You should now have the app running in the background in your taskbar.
Step 1: Run OpenVPN GUI. Find the icon in your Windows taskbar and right click on it.
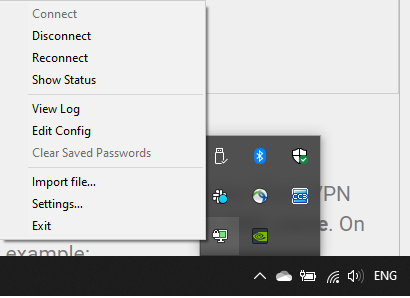
Step 2: You should select “Import file…” and select the OpenVPN configuration file you saved in Section 6. The file should end with .ovpn extension.
Step 3: Once selected, the OpenVPN GUI app should start connecting to the VPN you created. Congrats!